How to Estimate the Cost of a Mold or Die
-
 Mohamed Aboelfotouh
- Sector : General
- Oct. 2, 2026, 6:42 p.m.
A tooling quotation is a forecast of hours and purchases for a product that does not exist yet. Estimate too low and the job loses money; too high and it goes to a competitor. Buyers face the mirror image: without knowing how a price is built, they cannot tell a realistic offer from one that will lead to delays and claims. This article gives a structured method that works for injection molds, die-casting dies, stamping dies and extrusion tooling, with a worked example.
The structure of a tooling price
Every tool price can be built from five cost blocks, followed by overhead and margin.
| Block | Contents | Basis |
|---|---|---|
| 1. Design and programming | Feasibility review, tool design, drawings, simulation, CAM programming | Hours × hourly rate |
| 2. Materials and bought-in parts | Tool steel, mold base or die set, standard parts, hot runner, cylinders, springs | Supplier prices plus cutting and delivery |
| 3. Machining | Milling, turning, grinding, wire and sinker EDM, drilling of cooling | Hours per machine group × machine hourly rate |
| 4. Heat treatment, coating and bench work | Subcontracted treatments; fitting, spotting, polishing, texturing, assembly | Subcontract prices; hours × rate |
| 5. Trials and corrections | Machine time, material, measuring, correction loops, sample shipment | Number of trials × cost per trial, plus an allowance for corrections |
Then add:
- Overhead and risk that are not already inside the hourly rates;
- Margin;
- Delivery and commercial costs: packing, freight, insurance, financing of the payment terms, sales commission.
Step 1: Fix the scope
Most estimating errors are scope errors. Before counting hours, write down:
| Item | Why it matters |
|---|---|
| Part drawing or model revision, and open design points | Later part changes are extra work and should be priced as such |
| Number of cavities; family or single-part tool | Drives size, machining and balance |
| Expected tool life and annual volume | Decides steel, hardness and construction class |
| Part material | Wear, corrosion, shrinkage, hot runner type |
| Surface requirements: polish level, texture | Polishing can exceed machining hours on cosmetic parts |
| Tolerances that need special measures | Extra trials and corrections |
| Machine data: tonnage, platen, shut height, automation | Tool size and interfaces |
| What the price includes | Trials, sample quantity, measurement report, spare parts, texture, shipping terms |
Step 2: Outline the tool concept
A price cannot be estimated from the part alone. Sketch the concept: parting line, number of slides or lifters, gating, ejection, number of stations for a progressive die, number of plates. From it, list the main components and their sizes. Each moving element is a cost item in every block: design, steel, machining, fitting.
| Element | Typical effect on the estimate |
|---|---|
| Each slide or lifter | Adds design, several machined parts, fitting and trial risk |
| Hot runner | A large bought-in item plus wiring and extra plates |
| Deep ribs and sharp internal corners | Electrodes and sinker EDM hours |
| High-polish surfaces | Bench hours and better steel |
| Each progressive station | Punches, inserts, wire EDM hours |
| Interchangeable inserts or versions | Extra parts and fitting |
Step 3: Estimate materials
Calculate steel by block size, not by finished size: add machining allowance and saw cuts. Weight in kg = length × width × height in mm × 7.85 ÷ 1,000,000. Price each grade separately, and ask for current quotations for the mold base, hot runner and other large bought-in items. Add 5–10 % for small standard parts that are not individually listed.
Step 4: Estimate hours
Use two methods and compare them.
Bottom-up. List the main components and estimate hours per operation for each: roughing, heat treatment allowance, finishing, EDM, wire, grinding, drilling. Count electrodes: each one needs design, machining and burning time.
Top-down. Compare with completed jobs of similar size and complexity, using the actual recorded hours, not the hours that were quoted. A simple record of actual hours per finished tool, by block, is the most valuable estimating aid a shop can keep.
If the two results differ by more than about 20 %, find out why before quoting.
Step 5: Apply the rates
Machine hourly rates should cover depreciation, floor space, energy, maintenance, tooling and consumables, and the operator, at the realistic utilization of each machine group. A five-axis machining centre and a manual mill do not have the same rate. Using one average shop rate hides where the money goes and distorts every estimate.
Worked example
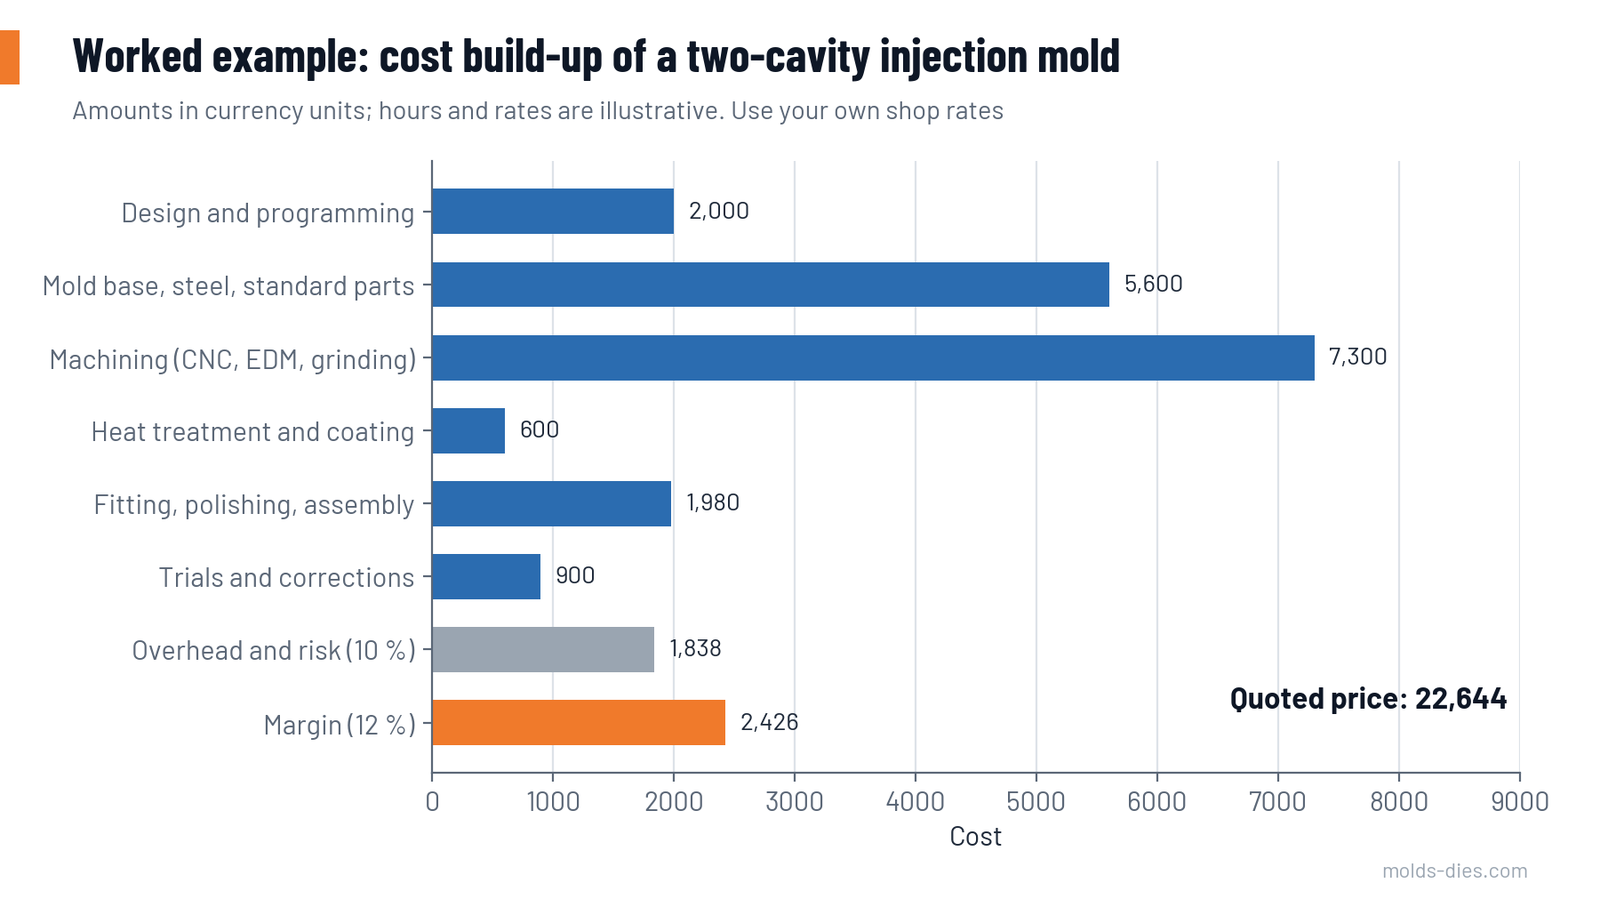
A two-cavity injection mold with two slides, cold runner, pre-hardened mold base and hardened cavity inserts. Amounts are in neutral currency units.
| Block | Detail | Amount |
|---|---|---|
| Design and programming | 80 h × 25 | 2,000 |
| Materials and bought-in parts | Mold base 3,500; insert and slide steel 1,200; standard parts 900 | 5,600 |
| Machining | CNC milling 160 h × 30 = 4,800; sinker EDM 60 h × 25 = 1,500; wire EDM 20 h × 25 = 500; grinding 25 h × 20 = 500 | 7,300 |
| Heat treatment and coating | Subcontract | 600 |
| Fitting, polishing, assembly | 110 h × 18 | 1,980 |
| Trials and corrections | 2 trials × 450 | 900 |
| Direct cost | 18,380 | |
| Overhead and risk | 10 % | 1,838 |
| Margin | 12 % of 20,218 | 2,426 |
| Quoted price | 22,644 |
Step 6: Check the result
| Check | Typical range | If outside |
|---|---|---|
| Materials and bought-in parts as a share of price | 20–35 % without a hot runner; more with one | Hours or materials are probably wrong |
| Machining as a share of price | 30–45 % | Review the concept and the electrode count |
| Design as a share of price | 8–15 % | Complex tools sit at the upper end |
| Bench work | 8–15 %; 20 % or more for high-polish tools | Check polishing assumptions |
| Price compared with similar past tools, adjusted for size and features | Within about 15 % | Look for a missed feature or a wrong assumption |
Risk and margin
Add a specific allowance for each real risk, not one general percentage:
- part design not frozen;
- tight tolerances on long dimensions in a material with uncertain shrinkage;
- new material, new customer, or a tool type the shop has not built before;
- cosmetic requirements judged by eye;
- penalties for late delivery.
Risk and margin together typically fall between 10 and 20 % of the price. Also price the payment terms: a tool paid 30 % with order and 70 % ninety days after approval ties up money for months.
For buyers: reading a quotation
Ask every supplier for the same breakdown: steel grades and hardness, mold base standard, hot runner make, number of cavities, lead time to first samples, number of trials included, guarantee of tool life, and terms. Then compare.
| Signal in a quotation | What it may mean |
|---|---|
| Much lower than the others with the same lead time | Lower steel grade, fewer hardened parts, no allowance for corrections |
| No steel grades stated | Open to substitution |
| Very short lead time | Parallel subcontracting; less control of quality |
| Trials "as needed" without a number | Later dispute about who pays |
| No mention of part changes | Every change becomes a negotiation |
Common mistakes
| Mistake | Consequence |
|---|---|
| Quoting from the part without a tool concept | Slides, lifters and electrodes forgotten |
| Finished sizes instead of block sizes for steel | Material 15–30 % too low |
| Underestimating polishing and fitting | Bench work overruns |
| No allowance for correction loops | Margin spent on the second trial |
| One average hourly rate | Complex tools underpriced, simple ones overpriced |
| Never comparing quoted and actual hours | The same errors repeat |
Key takeaways
- Build the price from five blocks: design, materials, machining, treatment and bench work, trials; then add overhead, risk and margin.
- Fix the scope and sketch the tool concept before estimating; each moving element adds cost in every block.
- Estimate hours bottom-up and check them against actual hours of similar past tools.
- Use sanity ratios to catch errors, and price specific risks and payment terms explicitly.
Related Articles
Preventive Maintenance Program for Molds and Dies
How to set up preventive maintenance for molds and dies: service levels, intervals by shot count, checklists, spare parts and tool history records.
Surface Treatments for Tooling: Nitriding, PVD and When Each Fits
A comparison of nitriding, PVD, CVD, TD and hard chrome for molds and dies: hardness, layer depth, process temperature and where each one works.
Laser Hardening in Manufacturing
Laser hardening is a precise surface heat treatment that improves wear resistance and durability of steel components with minimal distortion compared to traditional hardening methods.
Heat Treatment: Concept and Methods
Understand the various heat treatment methods like annealing, quenching, and tempering, used to alter the properties of steel and other materials
Understanding Molds and Dies: Differences, Types, and Applications
Explore the differences between molds and dies, their types, and applications in modern manufacturing. Learn how these tools shape raw materials into finished products
Hard Milling vs. EDM for Mold Cavities: When to Use Each
A decision guide for finishing hardened mold and die cavities: when hard milling is faster and better, and when sinker EDM is still required.