
Die Correction at the Press: Reading the Nose Piece
-
 Mohamed Aboelfotouh
- Sector : Aluminum Extrusion
- Oct. 2, 2026, 4:09 p.m.
A new extrusion die rarely runs perfectly on its first billet. The first length that leaves the die, the nose piece, shows how the metal flows through each part of the opening. Reading it correctly tells the die corrector where the flow is fast, where it is slow, and what to change. Reading it wrongly leads to corrections that have to be undone. This article gives a method for the trial and a table of typical shapes and their corrections.
Before judging the die
Many apparent die faults come from the press. Check these first, or the correction will only suit one bad setup.
| Check | Why |
|---|---|
| Die, backer and bolster at working temperature, heated for the right time | A cold die changes the flow and risks cracking; an over-soaked die softens |
| Billet temperature and taper as specified | Flow balance changes with temperature |
| Container, stem and die aligned | Misalignment shifts the flow to one side on every die |
| Correct backer and bolster, seated flat | A wrong backer lets the die bend and close thin sections |
| Billet at normal length and speed | Do not judge from a short, slow test billet only |
| Puller not yet attached for the first reading | The free nose piece shows the natural flow; the puller hides it |
The basic rule
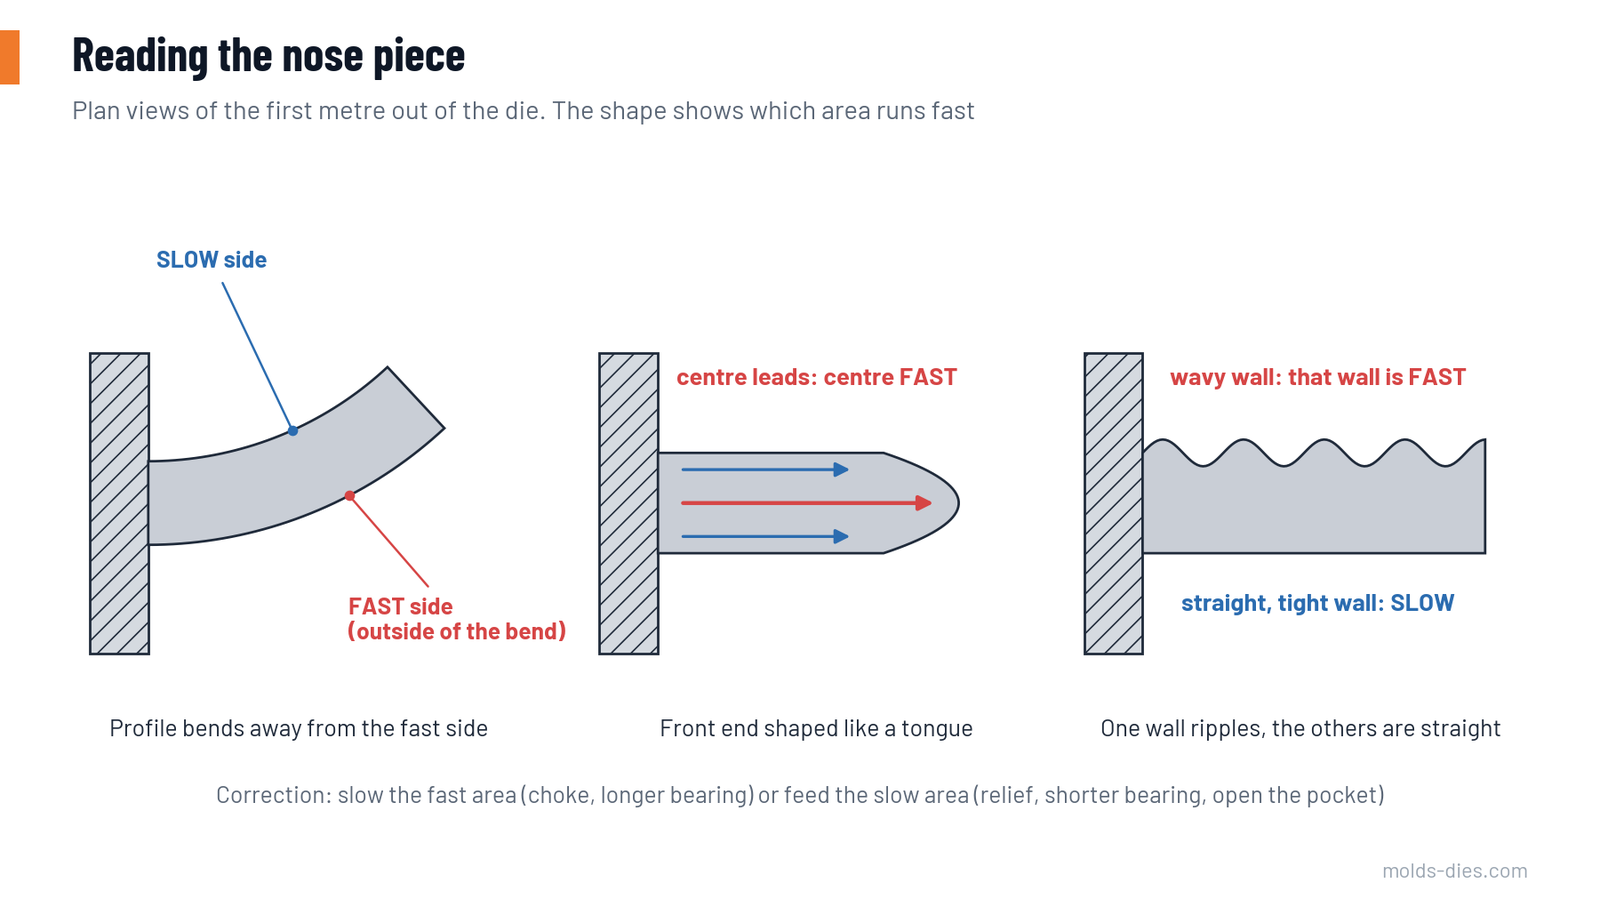
Metal that leaves faster than its neighbours has more length to place than they do. It forces the profile to bend away from the fast side, pushes ahead as a tongue, or buckles into waves if it is held between slower areas. Metal that is slow is stretched by its neighbours: the wall is tight, may be thin or under-filled, and in the worst case tears.
There are only two corrections:
| Action | Methods | Effect |
|---|---|---|
| Slow a fast area | Choke the bearing entry (file a small converging angle); restrict the pocket or port feeding it | Metal is held back |
| Speed a slow area | Relieve the bearing at the exit side so its effective length is shorter; open or deepen the pocket; enlarge the port; remove steel that shadows the area | Metal is fed more easily |
Speeding a slow area is generally preferred when possible, because it lowers the extrusion pressure. Choking adds pressure and heat. Both remove steel, so work in small steps.
Reading the nose piece
Cut the nose piece off after one to two metres, mark its top and its orientation to the die, and lay it on a flat table.
| What you see | What it means | Correction |
|---|---|---|
| Profile bends upward, downward or sideways | The side on the outside of the bend is fast | Slow the outside or speed the inside |
| Front end of a wall is tongue-shaped, centre ahead | Centre of that wall is fast | Choke the centre or relieve the ends |
| Front end concave, ends ahead | Ends of the wall are fast | Choke the ends or relieve the centre |
| Waves in the middle of a flat wall | Middle of the wall is fast and is held by slower edges | Slow the middle or speed the edges |
| Waves along a free edge | That edge is fast | Choke the edge |
| Wall tight, thin or torn at a tip | Tip is slow and is being stretched | Relieve the tip; open the feed to it |
| Twist along the length | Diagonally opposite areas are fast | Find the two fast corners; slow them or speed the others |
| Angle between two legs closed or opened | The inside or outside of the corner is fast | Balance the two sides of each leg near the corner |
| One wall of a hollow profile thick, the opposite thin | Core has shifted | Check port balance, bridge and core condition, and die seating before touching bearings |
| A wall curved across its width | Bearing lengths differ on the two faces of the wall, or the die is deflecting | Equalize the two faces; check the backer support |
| A leg or tongue closing in as pressure rises | Die tongue is deflecting under load | Improve support; the opening may need pre-compensation |
When two symptoms appear together, correct the larger flow error first. Many dimensional errors disappear once the speeds are balanced.
How much to change
- Small steps. Remove a little, run again, and compare. A correction that is too strong turns a fast area into a slow one.
- Change the feed for large errors, the bearing for small ones. If a wall is very slow, a relieved bearing will not rescue it; the pocket or port must be opened.
- Keep both faces of a wall equal unless you are deliberately correcting a curve.
- Blend every change into the neighbouring bearing over a length. A local step produces a streak.
- Protect the dimensions. Filing the bearing face itself opens the gap and makes the wall thicker. Choke and relief are made on the entry and exit edges, not across the whole bearing.
Tools and workmanship
| Tool | Use |
|---|---|
| Fine files and stones | Choke angles on the entry edge; small relief on the exit |
| Hand grinder with small points | Opening pockets, ports and relief behind the bearing |
| Straight edge, light and feeler gauges | Checking bearing flatness and squareness before and after |
| Bearing length gauge or depth gauge | Recording the actual lengths |
| Polishing stones and cloth | Restoring the bearing finish in the extrusion direction |
After correction, polish the bearing, clean the die and check that no burr remains at the bearing edges. If the nitrided layer has been removed over a significant area, re-nitride the die before production runs.
A trial procedure
| Step | Action |
|---|---|
| 1 | Verify the press conditions in the first table |
| 2 | Extrude the first billet without the puller; cut and mark the nose piece |
| 3 | Read the nose piece against the table; decide on one correction |
| 4 | If the flow is acceptable, attach the puller and extrude the second billet at normal speed |
| 5 | Measure the section at the front, middle and back of the extrusion |
| 6 | Correct, repeat, and stop when the profile runs straight with light puller tension and meets dimensions |
| 7 | Record every correction on the die history card with a sketch |
Dimensions should be judged from the second or third billet, when die and container temperatures have stabilized, and after stretching.
What to record
A correction that is not recorded is lost when the die is replaced. For each die, keep:
- the nose piece shape at the first trial (photo or sketch);
- each correction: position, method, approximate amount;
- final bearing lengths, measured;
- the press settings at approval: billet temperature, speed, exit temperature;
- dimensions of the approved sample.
Feed this back to the die designer or supplier. If the same correction is needed on every new die of a profile family, the design rule is wrong and should be changed at the source.
When not to correct
| Situation | Better action |
|---|---|
| The flow changes from billet to billet | Stabilize temperatures and alignment first |
| The profile is straight but dimensions are out | Check die deflection, backer and wear before changing bearings |
| The die has run well before and now runs badly | Look for wear, damage, aluminum build-up or a different backer, not for a design fault |
| The error is very large | Return the die for re-machining of pockets or ports |
Common mistakes
| Mistake | Result |
|---|---|
| Correcting after a cold or misaligned start | Die is "corrected" to suit a faulty setup |
| Judging flow with the puller pulling hard | Real imbalance hidden; tearing later at full speed |
| Heavy filing in one step | Fast area becomes slow; steel cannot be put back |
| Filing across the bearing face | Wall thickness out of tolerance |
| No blending | Streaks after anodizing |
| No record | Same trial repeated on the replacement die |
Key takeaways
- Confirm temperatures, alignment and support tooling before judging the die.
- The profile bends away from the fast side; tongues and waves mark fast areas; tight, thin or torn areas are slow.
- Slow the fast area with a choke or a restricted feed, or speed the slow area with relief or a more open feed, in small blended steps.
- Record every correction and return the information to the die design.
Related Articles
Billet Temperature, Ram Speed and Exit Temperature: The Process Window
How billet temperature, ram speed and exit temperature limit each other in aluminum extrusion, and how to find the fastest safe operating point.
Porthole Die Design: Ports, Bridges and Welding Chamber
Design rules for porthole (hollow) aluminum extrusion dies: number and shape of ports, bridge strength, welding chamber height and mandrel stability.
Bearing Length Rules for Balanced Metal Flow
How to set bearing lengths in an aluminum extrusion die: starting values, the factors that change them, and the rules that keep metal flow balanced.
Extrusion Defects: Die Lines, Pick-Up, Tearing and Their Fixes
The most common aluminum extrusion defects — die lines, pick-up, tearing, blisters, weld problems and dimensional errors — with causes and corrective actions.
Aluminum Extrusion Die Design Considerations
Discover the key considerations for aluminum extrusion die design, including material selection, die geometry, cooling, and stress analysis
The Aluminum Extrusion Process & Types
Aluminum extrusion process explained with an overview of extrusion dies including solid, hollow, semi-hollow, container, and seamless dies used to produce aluminum profiles.