
Billet Temperature, Ram Speed and Exit Temperature: The Process Window
-
 Mohamed Aboelfotouh
- Sector : Aluminum Extrusion
- Oct. 2, 2026, 4:10 p.m.
The productivity of an extrusion press is decided by how fast each die can run without defects. That speed is not a free choice. It is boxed in by the pressure the press can deliver, by the temperature at which the surface starts to tear, and by the minimum exit temperature the alloy needs for its mechanical properties. Billet temperature, ram speed and exit temperature are linked, and changing one moves the others. This article explains the links and gives a procedure for finding the fastest safe setting.
The three temperatures and one speed
| Parameter | What it controls | Typical range for 6063 |
|---|---|---|
| Billet temperature | Flow stress of the metal, and therefore the pressure needed | 440–480 °C |
| Container temperature | Heat flow between billet and liner; flow pattern of the billet skin | 30–50 °C below the billet |
| Die temperature at loading | Start-up pressure, first-billet quality, die safety | 440–480 °C |
| Exit temperature | Surface quality and solution of the alloying elements | 510–550 °C |
| Ram speed | Output; also the rate of heat generation | Set by the limits below |
Where the heat comes from
Almost all the work done by the press turns into heat inside the metal. Two sources matter:
- Deformation heat, generated as the billet is forced through the die. It increases with extrusion ratio and with flow stress.
- Friction heat, generated at the container wall and, most intensely, in the die bearing, right at the profile surface.
Some of this heat flows into the container, die and stem. The faster the press runs, the less time there is for that, so the exit temperature rises with speed. A rise of 40–80 °C between billet temperature and exit temperature is common, more at high extrusion ratios and speeds.
The same reasoning explains why exit temperature rises during the stroke at constant speed: the remaining billet has been heated by friction and deformation, and the die keeps warming up.
The two limits
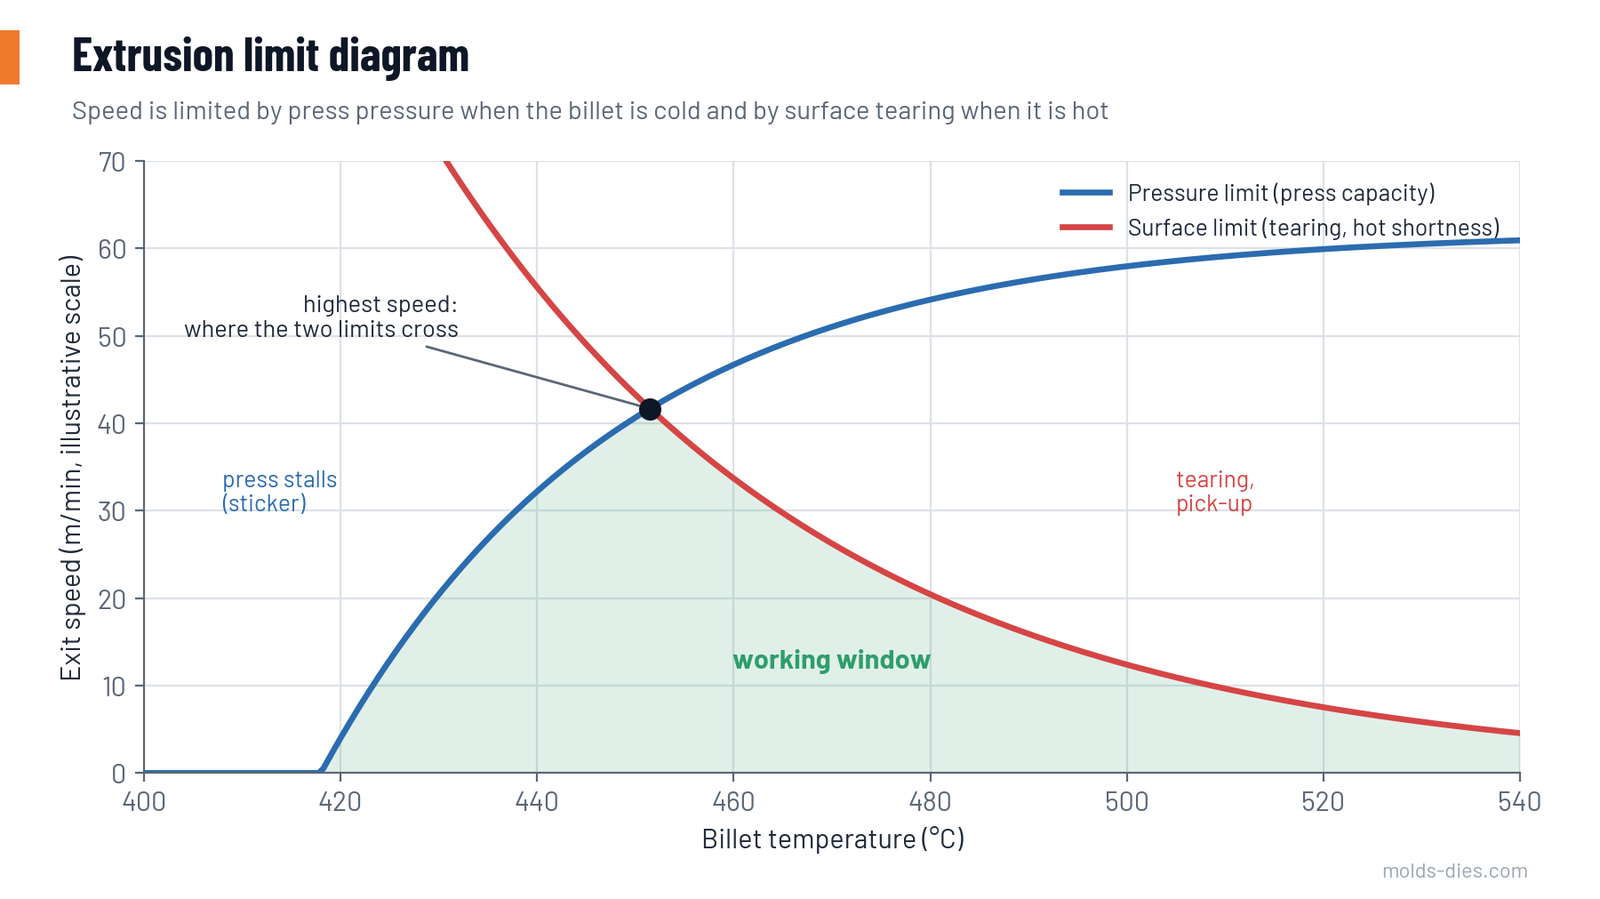
Pressure limit. A cold billet is strong. If the pressure needed to start extrusion (breakthrough pressure) exceeds what the press can deliver, the billet does not move: a "sticker". Higher billet temperature lowers the flow stress and allows more speed, so this limit rises to the right.
Surface limit. When the surface temperature in the bearing reaches the point where the lowest-melting constituents begin to melt, the surface tears. With a hotter billet there is less margin for the heat generated by speed, so this limit falls to the right.
The area under both curves is the working window. The highest possible speed is at the point where the curves cross. Below that billet temperature, the press is the limit; above it, the surface is.
A third boundary applies to heat-treatable alloys: the minimum exit temperature needed to dissolve the hardening elements. A setting that is too cold and too slow produces a good surface and a soft profile.
How alloys compare
| Alloy | Billet temperature (°C) | Exit temperature target (°C) | Typical exit speed (m/min) | Quench needed |
|---|---|---|---|---|
| 6060 / 6063 | 440–480 | 510–550 | 20–80 | Forced air is usually enough |
| 6005A | 460–500 | 520–550 | 15–50 | Strong air or water mist, depending on wall |
| 6061 | 470–510 | 520–550 | 10–30 | Water or intensive mist |
| 6082 | 470–520 | 520–560 | 5–30 | Water |
| 7075 and similar | 380–440 | Limited by low melting point | 1–3 | Separate solution treatment |
The stronger the alloy, the narrower the window: flow stress is higher, so the pressure limit moves right, and the melting range is lower, so the surface limit moves left.
Ways to widen the window
| Method | How it helps |
|---|---|
| Taper heating (front of the billet hotter than the back, typically by 30–60 °C over the length) | The front starts easily; the cooler back compensates for the heat built up during the stroke, so exit temperature stays level |
| Taper quench after uniform heating | Same effect, using a water spray on the back of the billet |
| Speed profile (decreasing speed along the stroke) | Holds exit temperature constant without a temperature gradient in the billet |
| Closed-loop isothermal control | A pyrometer at the exit adjusts ram speed continuously |
| Nitrogen cooling at the die | Takes heat from the bearing area; raises the surface limit |
| Well-homogenized billet | Raises the temperature at which tearing begins and lowers flow stress |
| Die design with lower friction | Shorter, well-polished bearings; open feeds; less pressure and less heat |
| Shorter billet | Lower breakthrough pressure; moves the pressure limit, at the cost of more butts and welds per tonne |
Finding the best setting for a die
- Start from the alloy's standard values: mid-range billet temperature, container 30–50 °C lower, moderate speed.
- Measure exit temperature with a pyrometer aimed at the profile close to the die exit. Record it at the start, middle and end of the stroke.
- Raise the speed in steps of about 10 %, one billet at a time, until the first signs of pick-up or tearing appear at the end of the stroke, or until the exit temperature reaches the upper target.
- Step back one increment. That is the speed limit for this billet temperature.
- If the press pressure is well below its maximum at breakthrough, lower the billet temperature by 10 °C and repeat. A cooler billet allows more speed before tearing.
- If the press is close to maximum pressure, do not lower the billet temperature further. You are near the crossing point of the two limits.
- Confirm properties. Check that the exit temperature at the start of the stroke is above the minimum for the alloy and that hardness after ageing meets the specification.
- Flatten the exit temperature curve with taper heating or a speed profile, then repeat step 3. The whole stroke can now run at the speed that only the start could tolerate before.
- Record the settings on the die card as the recipe for the next run.
Reading the symptoms
| Symptom | Position on the diagram | Move |
|---|---|---|
| Press stalls or breakthrough pressure at the maximum | At the pressure limit | Raise billet temperature; shorten the billet; check die temperature |
| Tearing or pick-up from the start of the stroke | Above the surface limit | Lower speed or billet temperature |
| Tearing or pick-up only toward the end of the stroke | Exit temperature rising | Add taper or a decreasing speed profile |
| Good surface but low hardness | Exit temperature below the solution minimum | Raise billet temperature or speed; improve the quench |
| Surface good at low speed, pressure moderate | Inside the window with reserve | Raise speed |
| Properties vary from front to back | Exit temperature or quench not constant | Level the exit temperature; check the quench |
Container and die temperature
- A container hotter than the billet softens the billet skin, which then flows into the profile earlier and brings oxide with it. Keep the container cooler than the billet.
- A container that is much too cold chills the billet during upsetting and raises the pressure.
- A cold die raises breakthrough pressure sharply and is the most common cause of die breakage on the first billet. Use a die oven with a controlled soak time; avoid both under-heating and long over-soaking, which softens the die and oxidizes the bearings.
What to measure and record
| Measurement | Where | Why |
|---|---|---|
| Billet temperature, front and back | At the heater exit, with contact probes | Confirms the taper actually delivered |
| Breakthrough and running pressure | Press control system | Shows the margin to the pressure limit |
| Exit temperature | Pyrometer near the die exit | The main control variable |
| Ram speed and profile speed | Press control system and puller | Output |
| Quench rate | Profile temperature after the quench zone | Properties |
Common mistakes
| Mistake | Result |
|---|---|
| Raising billet temperature to "help" a die that tears | Tearing gets worse; the surface limit is lower at higher billet temperature |
| One recipe for all dies of an alloy | Easy dies run far below their potential; difficult dies tear |
| Judging by billet temperature only | Exit temperature, the value that matters, is unknown |
| Uniformly heated long billets at constant speed | Good front, torn back end |
| Container at billet temperature or above | Back-end defect and blisters |
Key takeaways
- Speed is limited by press pressure for cold billets and by surface tearing for hot billets; the best setting is near where the two limits meet.
- Exit temperature is the variable to measure and control. Keep it inside the alloy's range for the whole stroke.
- Taper heating, speed profiles and nitrogen die cooling raise the usable speed by keeping the exit temperature level.
- Lowering billet temperature, not raising it, is the usual way to gain speed when the press has pressure in reserve.
Related Articles
Die Correction at the Press: Reading the Nose Piece
How to read the first extruded length (nose piece) and decide the correction: where to slow the flow, where to speed it up, and how much to change.
Porthole Die Design: Ports, Bridges and Welding Chamber
Design rules for porthole (hollow) aluminum extrusion dies: number and shape of ports, bridge strength, welding chamber height and mandrel stability.
Bearing Length Rules for Balanced Metal Flow
How to set bearing lengths in an aluminum extrusion die: starting values, the factors that change them, and the rules that keep metal flow balanced.
Extrusion Defects: Die Lines, Pick-Up, Tearing and Their Fixes
The most common aluminum extrusion defects — die lines, pick-up, tearing, blisters, weld problems and dimensional errors — with causes and corrective actions.
Aluminum Extrusion Die Design Considerations
Discover the key considerations for aluminum extrusion die design, including material selection, die geometry, cooling, and stress analysis
The Aluminum Extrusion Process & Types
Aluminum extrusion process explained with an overview of extrusion dies including solid, hollow, semi-hollow, container, and seamless dies used to produce aluminum profiles.